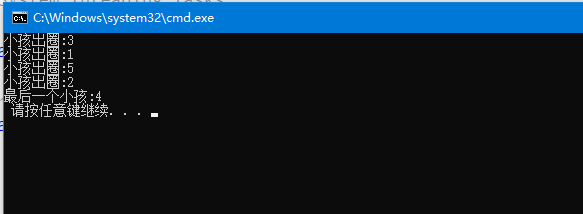
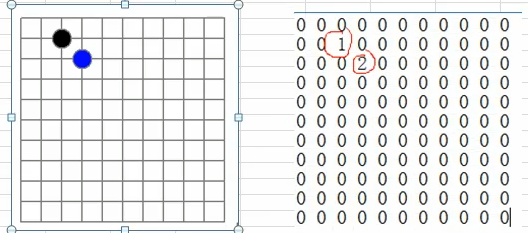
一:单向环形链表应用场景

二:分析思路:
1.自己分析:
给链表编辑一个add(),一个del(),获取链表长度getlength(),默认从1开始数。
初始化的时候,通过Add方法读取在数据环中,一次加载,接下来。
做while遍历,当读取到m的时候,首先检查链表的长度,如果长度大于1就移除一个元素,当长度等于1的时候跳出循环
代码实现:
1
2
3
4
5
6
7
8
9
10
11
12
13
14
15
16
17
18
19
20
21
22
23
24
25
26
27
28
29
30
31
32
33
34
35
36
37
38
39
40
41
42
43
44
45
46
47
48
49
50
51
52
53
54
55
56
57
58
59
60
61
62
63
64
65
66
67
68
69
70
71
72
73
74
75
76
77
78
79
80
81
82
83
84
85
86
87
88
89
90
91
92
93
94
95
96
97
98
99
100
101
102
103
104
105
106
107
108
109
110
111
/// <summary>
/// 删除节点
/// </summary>
/// <param name="no">节点的值</param>
public void del(int no)
{
Hero temp = gethead();
if (no== temp.no)
{
if (head.next==foot)
{
Change();
}
else
{
temp = foot;
temp.next = temp.next.next;
head = temp.next;
}
}
else
{
temp = getpre(head, no);
temp.next = temp.next.next;
Change();
}
}
/// <summary>
/// 只有2个节点的时候,直接出
/// </summary>
public void Change()
{
if (head.next == foot)
{
Console.Write(head);
head = foot;
head.next = null;
}
}
/// <summary>
/// 获取待删除节点的上一个节点
/// </summary>
/// <param name="temp">头节点的</param>
/// <param name="no">要删除的节点</param>
/// <returns></returns>
public Hero getpre(Hero temp,int no)
{
while (true)
{
if (temp.next.no == no)
{
break;
}
temp = temp.next;
}
if (temp.next==foot)
{
foot = temp;
}
return temp;
}
/// <summary>
/// 获取链表的长度
/// </summary>
/// <returns></returns>
public int getlength()
{
Hero temp = head;
int num = 0;
while (true)
{
num++;
temp = temp.next;
if (temp.no==head.no)
{
break;
}
}
return num;
}
/// <summary>
/// 输出打印
/// </summary>
/// <param name="m">数m下</param>
public void showlink(int m)
{
Hero temp = head;
int num = 0;
int leng = getlength();//获取链表的长度
if (head == null)
{
Console.WriteLine("参数输入有误,请重新输入!");
return;
}
while (true)
{
if (temp.next==null)
{
break;
}
num++;
if (num%m==0)
{
Console.WriteLine(temp.no);
del(temp.no);
}
temp = temp.next;
}
Console.WriteLine(temp);
}
2.老师分析:
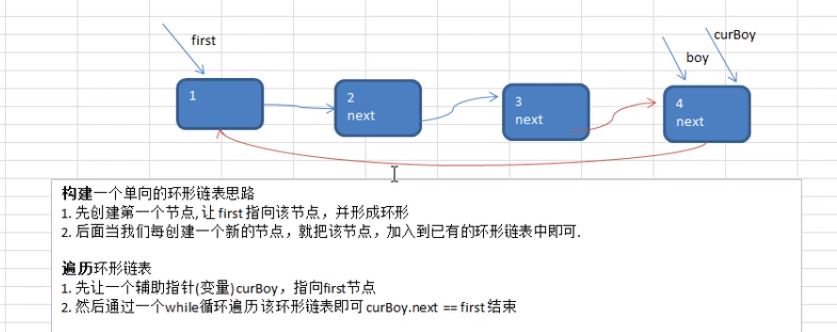
代码实现:
1 | /// <summary> |